| Publish to the web |
The publish to the web wizard appears when you click this toolbar button :

Step 1 of 5 of the thumbnail creation process
What a thumbnail is made of in terms of files
The pages of the wizard allow to customize the layout and content of the web thumbnail. The options available to you are chosen to be useful and easy to understand.
A web thumbnail has one or more pages, depending on the amount of shots and constraints specified in options. Each page is saved as a standard .html file or as a .mhtml file (web archive, see here for more). Shots are created as .jpg pictures. The physical structure of a typical html thumbnail with 2 pages is displayed in the screen capture below :
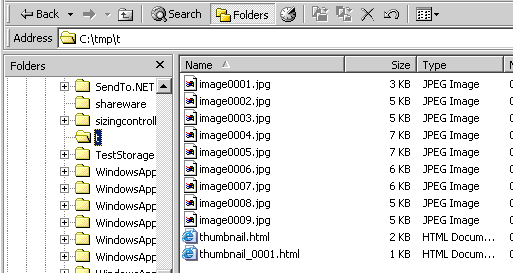
A thumbnail with 2 pages
thumbnail.html is the first page and entry point. When you open it, at its bottom, it's got a Next link that opens the second page, thumbnail_0001.html. There is no Previous button to get back to the previous page, since the web browser already provides this feature natively.
The structure of the thumbnail itself is completely open and can rely on an html template. However because not everyone is willing to rely on templates, AVS also provides a default thumbnail generator.
Two thumbnail generators
Default generator
The structure of a thumbnail is quite simple. A thumbnail has one or more pages. Pages are linked to each other thanks to a Next link at the bottom. Each page has a title and a table that contains all shots that the page can contain according to the bandwidth requirements (one of the options you can change). The table can be further customized for instance by setting the border width to 1 pixel, or by adjusting the amount of shots per row. All shots can be customized by setting the picture size, or by changing the shot caption with keywords.
For more insight on personalizing the thumbnails, take a look at keywords. Also take a look on formatting issues here. Please note that keywords can be added to the Title and/or the shot caption, and the set of keywords available depend on where you are adding those. For instance, the shot caption has more keywords to play with.
Template-based generator
The template-based generator relies on a html file and adds shots into it. This allows to create thumbnails that match exactly your layout needs, without bothering anymore the constraints of the default generator, which is great and easy to use by cannot meet everyone's needs. For more information about templates, look here.
Dynamic keywords
AVS grants users the ability to use dynamic keywords in order to take advantage of contexts when creating thumbnails. To understand dynamic keywords, let's consider you have ten shots and want to create a thumbnail out of those. At generation time, the $(INDEX) keyword has a value which is updated throughout the process to reflect the current shot being generated and inserted into the thumbnail. The value is, in sequence, 1, 2, 3, ..., 9, 10. Taking advantage of this keyword lets you create captions based on the current shot, or links to that shot, or anything else you might think of.
Whether you are using the default generator or the template-based generator, all keywords are available. Some of those keywords can be used for dynamic page title captions and dynamic shot title captions. Some additional keywords can be used for Next/Previous navigation links between pages. Some additional keywords are available for the template-based generator only.
Html versus web archive file formats
It's up to you to decide whether you want the thumbnail to be created in standard html format, or web archive file format. With the html file format, each page is associated to a .html file, and each shot is an external file, which can lead to a significant amount of little files to manage. Alternatively, the web archive file format puts all pages and retains all shot pictures within a single file, all encoded. Think of a web archive like a zip package. The web archive file format is best suited for deployment or file sharing. Thumbnails created with the web archive file format can be open with leading web browsers as well as standard email clients. More info about the web archives in AVS.
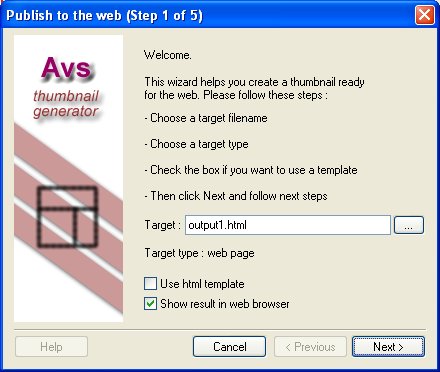
How to set the options - Step 1
Step 1 of 5 of the thumbnail creation process
First, give a target filename to the thumbnail. You can type a fully qualified filepath of the form c:\tmp\thumbnails\mythumbnail.html or click on the browse button to open/select some folder, and enter a filename, for instance mythumbnail.html. All shot pictures and additional include files will be stored in the same folder. Alternatively, if you type only the name of a folder, instead of a fully qualified filepath, then AVS will create a thumbnail with the following name : output1.html.
If you type and/or select a filepath with a .mhtml suffix, then it will create a web archive, instead of a set of html pages. This is reflected by the user interface in the Target type field.
Leave the Use html template checkbox unchecked if you want the default generator to create thumbnails for you. See here for more information about html templates.
Leave the Show result in web browser checkbox checked in order to automatically see the the resulting thumbnail in your default web browser once it's generated.
Click Next to go to Step 2. Please note the user interface for Step 2 is different whether or not you check the Use html template checkbox.
How to set the options - Step 2 - default generator
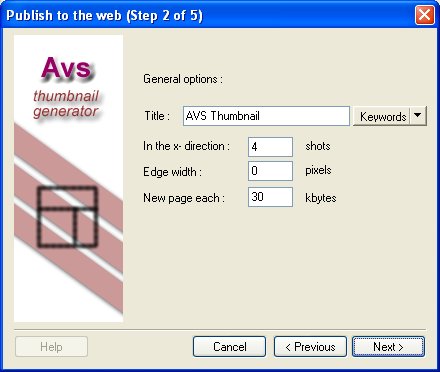
Step 2 of 5, with the default generator
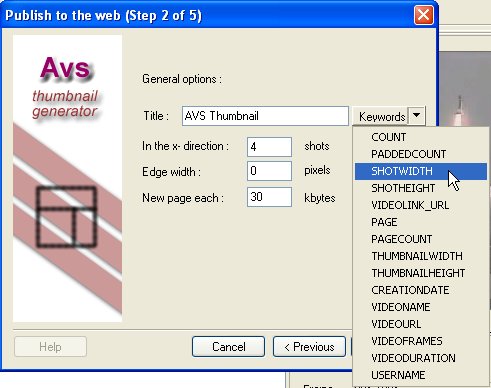
Step 2 of 5, unfolding possible keywords for the title
General options
- the
Titleof the thumbnail. This one appears at the top of the thumbnail. You can provide a simple text or combine keywords by clicking the keywords button. Let's take an example, if your name is Paul and you want to add the creation date of the thumbnail in the title as well as your name then you can type this : thumbnail created by$(USERNAME)on$(CREATIONDATE). If you want to index the current page out of a number of pages, then you can type this :thumbnail ($(PAGE) / $(PAGECOUNT)). And so on. Please note you can use html tags as well. For instance, if you type thumbnail created by<b>$(USERNAME)</b> on <b>$(CREATIONDATE)</b>then the user name and the creation date will be displayed in bold. in the x-direction: [---] shots: with this parameter you tell how many shots per row are going to be inserted in the thumbnail. Default value is 4.Edge width: [---] pixels: this parameter lets you set the border width of the container of all shots. Default value is0, which means that there are no borders at all.New page each : [---] kbytes: this parameter lets you insert bandwidth requirements as part of the thumbnail generation process. For instance, it's probably not a good idea that each page of your thumbnail carries say 200 kilo-bytes of shot pictures, if your audience is using dial-up to connect the web. In this case, it's a good idea to further constraint the thumbnail generation process by telling the amount of kilo-bytes per thumbnail. As you probably guess, this has a direct impact in the number of pages that will be generated. Actually, breaking the thumbnail into multiple pages is achieved with this parameter. Default value is 30 kilo-bytes, which means that each page won't require your audience to download more than 30 kilo-bytes of content before the page is completely loaded.
Click Next to go to Step 3. Please note that you can click Next without changing any of the default values.
How to set the options - Step 2 - html template
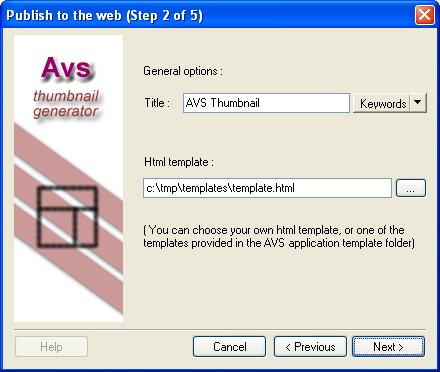
Step 2 of 5, with the template-based generator
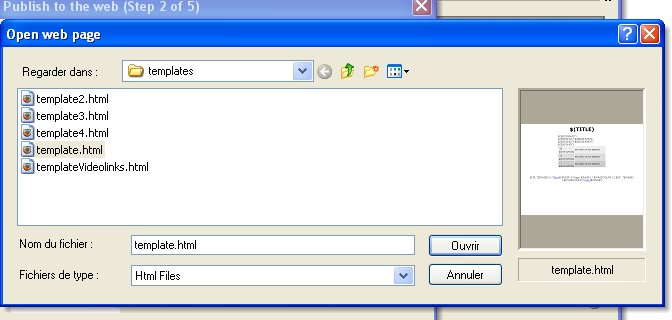
Step 2 of 5, previewing templates
General options
- the
Titleof the thumbnail. This one appears at the top of the thumbnail. You can provide a simple text or combine keywords by clicking the keywords button. Let's take an example, if your name is Paul and you want to add the creation date of the thumbnail in the title as well as your name then you can type this : thumbnail created by$(USERNAME)on$(CREATIONDATE). If you want to index the current page out of a number of pages, then you can type this :thumbnail ($(PAGE) / $(PAGECOUNT)). And so on. Please note you can use html tags as well. For instance, if you type thumbnail created by<b>$(USERNAME)</b> on <b>$(CREATIONDATE)</b>then the user name and the creation date will be displayed in bold. - The html template editbox along with the browse button allow to select an external template file. This editbox should indicate the fully qualified filepath of a .html file. A template file provided the base decoration of your thumbnails, as well as formatting rules. When clicking the browse button, a html previewing window opens with a default AVS
templatesfolder, with a couple ready-to-use template files. Alternatively, you can select your own html file. For more information on html templates, look here.
Click Next to go to Step 3. Please note that you cannot click Next without indicating the template file to work with.
How to set the options - Step 3
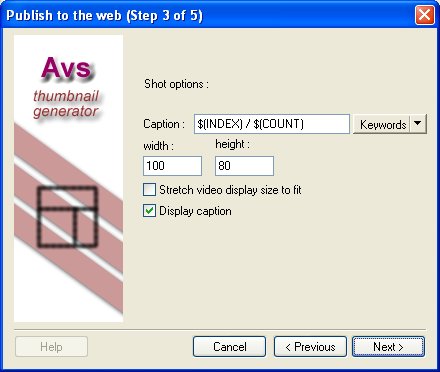
Step 3 of 5, shot options
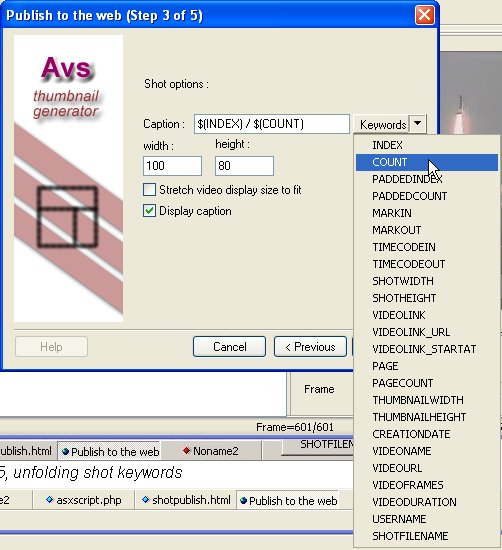
Step 3 of 5, unfolding shot keywords
Shot options
- Shot caption : just like the
Titleparameter in Step 2, you can personalize the caption added to each shot by either putting a raw content or by using a combination of content and keywords. Keywords are further detailed here. Some keywords are shot-specific, as the$(INDEX)keyword. For instance, if a thumbnail has 4 shots overall, and the caption is$(INDEX) / $(COUNT), then captions associated to shots will be :1 / 4,2 / 4,3 / 4and4 / 4respectively. Please note you can insert html tags as well. For a caption to be displayed at the bottom of each shot, theDisplay captionoption must be checked. width : [---] pixels: this parameter lets you stretch the width of each shot to an arbitrary amount. Default value is 100 pixels wide. If theStretch video display size to fitoption is unchecked then the shot picture is stretched using a simple html tag trick, achieved by setting the appropriate width attribute in the <img> tag. The use of the html tag trick preserves the bandwidth. If the option is checked, AVS really resizes the actual shot picture using information from the video. This usually produces a nicer thumbnail, but it has an impact on bandwidth. Make sure to use the options accordingly to your expected audience's bandwidth.height : [---] pixels: same than above, for the height of each shot. Default value is 80 pixels tall.Stretch video display size to fit: if checked, the shots are resized using the information and content from the video. If not checked, the shots are resized using an html tag trick, which allows to keep the bandwidth the same, but with less good-looking shots than otherwise.Display caption: if checked, the shot caption is inserted below each picture. If not checked, the shot caption is not inserted no matter the shot caption definition (see above).
Click Next to go to Step 4.
How to set the options - Step 4
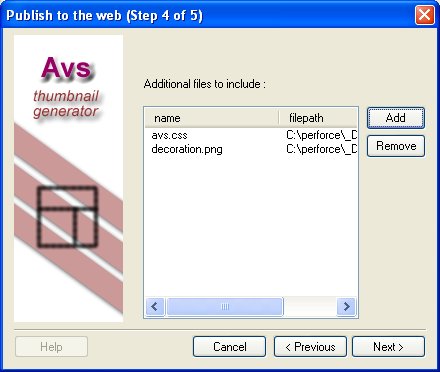
Step 4 of 5, additional files to include
What are additional files to include? It's a rather elegant way to add any external files along in the folder where thumbnails get created. It makes sense in a publish to the web scenario since a thumbnail is likely to be linked to other content as well.
To add files, just reference them by clicking the Add button. At any moment, references can be removed by selecting one or more of them and clicking Remove. Please note only references are removed, not the actual files.
How do those files relate to those files referenced in the thumbnails? They are really separate. But this raises a good question regarding the files required by the thumbnail generators, both the default and the template-based generators. The default generator needs no other files than the shot pictures, and those are created on-the-fly by AVS already. Regarding the template-based generator however, it's a different case since the .html file provided can reference one or more external files, like css stylesheets, javascript source code, pictures, and so on. AVS automatically parses the .html template file, finds out all the following type of files :
- A css stylesheet, part of a <link href="..."> tag
- A javascript source code, part of a <script language="javascript" src="..."> tag
- A picture, part of a <img src="..."> tag
and automatically copies (.html file generation) or embeds (web archive generation) the referenced files.
Click Finish to start the generation.
How to set the options - Step 5
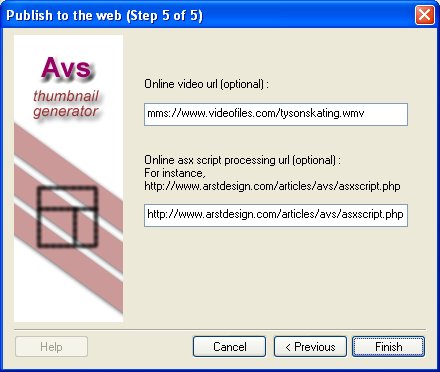
Step 5 of 5, information for video hyperlinks
If you don't intend to use video hyperlinks in the thumbnail, then you can click ignore this step and simply click Finish. Otherwise, this step is very useful in order to let you define the information required to resolve hyperlinks and make them useful.
The online video url is the media url where the video can actually be accessed. If you opened a video online, then this field should already be filled by that url. If you opened a local video, available from your hard drive or a fixed drive, then you need to provide an online url for the video hyperlinks to work.
The online asx script processing url is the url to a special web server page which can be the target of a web request (when the user clicks a video shot), in order to build an Windows Media asx script file which in turn will start playing a video segment. The asx script technique is required to play a video segment rather than the full video. Fortunately, this web server page can be written with any server-side language, including PHP/JSP/ASP(.NET) and so on. The documentation provides a sample implementation written in PHP, but feel freely to create your own.