(utility) Perforce local file checker
Stéphane Rodriguez - Sept 26, 2005
Perforce local file checker in action
Who, what, when, where
How often do you break nightly builds? When it happens, what is the cause half the times? Could it be that someone in the team forgot to submit one or more files in Perforce? Mistake, yeah a mistake but hard to diagnose since that person in the team has the missing file(s) on his hard drives. The thing is, it takes a lengthy boring multi-machine source code move to figure out there might be a problem. The problem being made worse with the fact that Perforce gives no help. Nothing in the UI or through the command-line lets you know the potential misses between the Depot view and your local view. So that's the sad state of software development using Perforce. But...
This tool lets you keep your source code in sync with your Perforce depot. The magic that this tool accomplishes is to find out which of your local files are not yet submitted in the Perforce depot. There are myriad of options, but the default ones should be good enough already.
Perforce is a great source control management (SCM) tool. Definitely among the top 3 actually, it's fast and it has everything you want. Well everything you want except one thing which oddly enough has not yet found its way in the main product features. What is missing is a notification system or a tool which lets you know that one or more files you are working with are not submitted yet and, if you forget to do so, then this will have terrible effects when build machines try to build your source code, not to mention that sharing your source code among peers through Perforce is going to have issues.
This tool solves just that. It lets you define a folder where you know your source code is, and the tool will automatically find out and tell which of the files are not yet in the Perforce depot. It will do that upon clicking the Refresh button in the user interface, or automatically thanks to the scheduling options.
Clicking the Add To Depot button will then add the chosen files in the Default Perforce changelist, hence ready for your next code delivery.
There are options to play with that tell the tool to ignore files with a given pattern or filepath, and also entire folders with a given pattern or path.
The tool is free to use. It is not legal however to resell this product or integrate it in commercial solutions however.
The tool is provided "as is" and was developed by me in its entirety. You are responsible for any damage or loss incurred by using the product. Perforce is a trademark of Perforce.com.
Troubleshooting problems
Depending on the P4 client front-end installed, P4V or P4Win, there is a likelihood that you run into troubles. Please note that Perforce local file checker does not require that those tools are running at all. Perforce local file checker however requires that P4Win is installed and has been run at least once. The installer is available here. The first time P4Win runs, it prompts the user and eventually sets up the Perforce registry configuration appropriately, which the tool relies on. If you have installed P4V alone, i.e. never installed or run P4Win, then there is a likelihood you'll run into errors like : Perforce installation lacks a working client spec. (Missing regkey :
HKCU/Software/Perforce/environment:P4CLIENT) upon running Perforce local file checker. The reason why those problems occur is because P4V uses a completely different configuration store than P4Win. Getting this P4V-specific configuration store supported natively in Perforce local file checker does not help matters because some of the important Perforce registry keys still need to be updated.
Alternatively, you can avoid installing P4Win and simply start Perforce local file checker using the command-line. Example : perforcechecker.exe P4USER srodriguez P4PORT 127.0.0.1:1980 P4CLIENT newworkspace.
How to use it?
First of all, unzip the package anywhere you want and double-click on the executable. The tool has zero binary dependency with the Perforce libraries, neither VC++ dlls so it should work just fine on all platforms, well at least if you are running on Windows.
The tool however assumes a Perforce client (P4Win) is installed on the machine, with a clientspec. The tool does not assume a Perforce client is running, so you should not have to worry about anything. The tool adds files to the Perforce depot thanks to the P4.exe engine command line.
Once the tool is started, you need to select a folder to monitor. Click on the Folder...button as shown in the capture below, select a folder and click OK. Alternatively, you can simply type or paste a folder path in the edit box next to it.

Selecting a folder to monitor
When you do so, this folder and all subfolders are monitored. As soon as you return from the folder selection box, the tool automatically does perform the first phase of its job, find files that are not yet in the Perforce depot. At this point, if nothing happens, try to click on the Refresh button. If the Refresh button is greyed out then you probably have a config problem. The tool contacts the Perforce server and so the time it takes to complete this phase depends on your network speed and on the Perforce server health.
To accomplish the job, the tool contacts Perforce on one hand and lists the content of some of the depot, the part that is mapped with the monitored folder. On the other hand, the hard drive is crawled to find all files, and then the file matching begins. The tools uses a lot of existing file extensions, suffixes, and folder names to ignore most commonly known temporary files that have no point being submitted to the Perforce depot. For instance, the \Debug folder of a typical VC++ project contains pdb files, obj files, and a bunch of other file types that are of no use from a Perforce stand point. Those folders are automatically ignored. If you'd like to know exactly what is filtered out, click on the Options button in the main dialog.
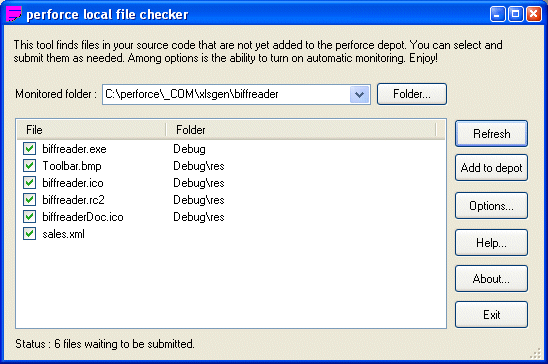
When the first phase is completed, a number of checked files are displayed in the list area. Also, the status bar tells how many files there is.
A typical listing of local files that are not yet in the Perforce depot
At this point, the information is already very valuable and you can proceed by adding the files manually to Perforce if you are used to do this. But otherwise, the tool lets you add those files without worrying much.
In order to add the files to the Perforce depot, make sure to check the files supposed to be submitted. By default, all files resulting from the first phase computation are checked. You can double-click a file in order to switch check-all/uncheck-all, and you can of course check/uncheck a particular file.
When you think you've got everything ready, just click the Add to depot button. The tool adds all the checked files in the Default Perforce changelist of your current clientspec. The tool contacts Perforce and so the time it takes to complete this phase depends on your network speed and on the Perforce server health.
When this phase is complete, the files are removed from the list area. If you click Refresh, you should not see them appear again. If you see the files again, then probably there was some problem.
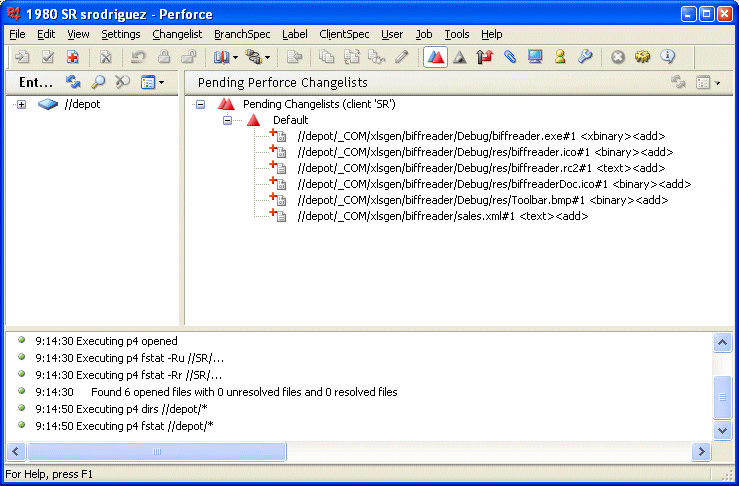
The files are now in the Default Perforce changelist and ready for a submit
The Perforce Default changelist knows the files to add on the next code submission. You can proceed like you always do to finish the actual Perforce changelist submission. Not automating the submission of the changelist was chosen in order to let the developer verify and then decide when to submit the code. In practice, it's often the case that those files are better off if they are submitted at the same time than other code changes. Of course, if you start a Perforce client at this point, you should see those files in the changelist, can move them to another changelist, revert them, etc.
Getting more from the tool
The explanations don't explain everything in details. Here is the missing stuff.
Opening the candidate files
First of all, once you get candidate files in the list area, you can open each of those (multi-selection is supported) in either the associated application or in notepad. Simply right-click them.
Ignoring files with such extensions
If files with a given extension appear, and you know you don't want to see them, then you can right-click and choose Always ignore file extension. It will add the current file extension to the list of known file extensions to ignore. You can check the list of known file extensions by clicking on the Options button.
Ignoring the current file
May be the file should be ignored by name rather than by file extension. Simply right-click the file and choose this option. Again, the file name is added in the list of files to ignore and you can check the list by clicking on the Options button.
Main file options
When you click the Options button, the following dialog appears.
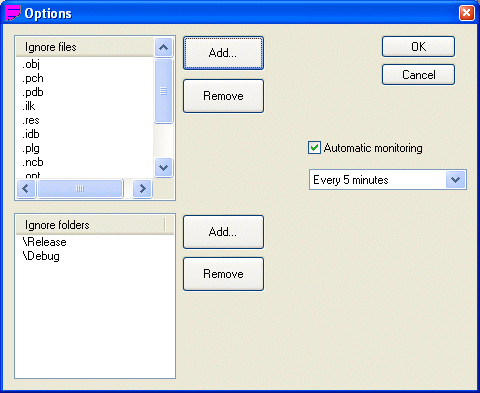
The main options
Ignore other files
At any point in time, you can check the list labelled Ignore files to see exactly what are the rules enforced by the tool. The list has several types of file patterns.
Ignore files by their extension
If you'd like to ignore a file given its extension, simply click the Add button and type a dot followed by the extension. For instance .xls. This will ignore all files with such name extension in all monitored directories.
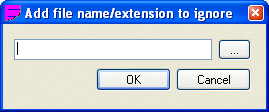
Adding a file to ignore, by extension, suffix, or name
Ignore files by suffix
Alternatively, you may need a more flexible pattern. The suffix pattern allows to define files by their suffix. For instance *_i.h defines all files ending with _i.h in their name, as in component_i.h (this file is very common in COM related projects). If you'd like to add your own suffix, simply click Add and type a star character, followed by the suffix itself.
Ignore files by name
Alternatively, you may want to ignore all files with a given name. For instance TODO.txt. If you click Add and type TODO.txt, then it will ignore all such files in all monitored directories and subdirectories. This is a convenient option when you know you'd like to filter the files but only those, and obviously choosing files by their extension or their suffix is not the right thing to do as it would end up filtering out all .txt files from the monitoring.
Ignore files by their fully qualified file name
May be you'd like to ignore a given file in a given folder. What you can do to accomplish that is click Add, perhaps click the ... button and select that file, or simply type the fully qualified filepath (or right-click in the list area in the other dialog box of the user interface), and click OK. This is a convenient option if you have for instance 3 TODO.txt files in different places, and there is really only one of these you'd like to filter out from the monitoring.
Ignore entire content of folders
As you know by now, when you indicate a monitored folder, all subfolders are monitored as well. You may want to filer out some of those subfolders. In addition to this, in the Windows environment with VisualStudio, projects usually produce temporary subfolders named Debug, Release (those are the project target names), and those folders are obviously not worth submitting to Perforce. By default, those folders already exist in the list of ignored folders, so you don't have to worry much about it. If you'd like to add more folders, simply click on the Add button and type the name of that subfolder, starting from the monitored folder. For instance, \Debug. All the files in those folders will be ignored, regardless the filtering rules that apply to files.
Ignore a fully qualified folder
The last option is to fully qualify a folder to ignore, for instance C:\tmp\project. This can be a convenient option in last resort. You can click the Add button and then type or select that folder.
Removing some files or folder from the list of ignored files/folders
Simply select those files on the list, and click Remove. Multi-selection is supported.
Scheduling for automatic monitoring
A fine option provided by the tool is to automatically monitor a folder (and all its subfolders) on a regular basis. Thanks to the option, a lot of user interface clicks (Refresh button) are not needed anymore.
By default, scheduling is off. To enable it, you need to click on the Options button, then check the Automatic monitoring label. This in turn activates the drop down from which you can select the time interval of your choice. See screen capture.
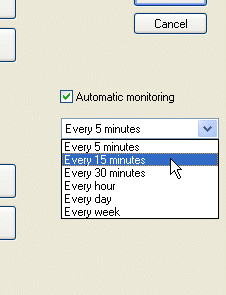
Choosing a scheduling interval for the automatic monitoring
What the automatic monitoring saves you from doing is to click the Refresh button. You still need to manually click the Add to depot button in order to actually add files in the Perforce changelist, ready for actual submission.
Needless to say, the tool must be running for the scheduled monitoring to take effect.
Enjoy!
Stéphane Rodriguez.
Home
Blog