| Context menus |
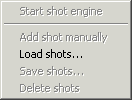
There are two context menus. The main context menu is popped up when right-clicking on a blank area of the main window. This window is brought up :

Main context menu, without any video being loaded
Most functions are disabled if you have not loaded a video yet. Using the Load shots option, it is possible to open an existing .hpv file. An .hpv file is a sequence of recorded shots from a previous work.
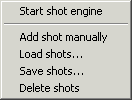
After opening a video, more options are enabled as showed below :

Main context menu, with a loaded video
The functions can be described as :
| Menu option > | Description | |
| Start/Stop shot engine | Starts or Stops the automatic shot engine, the most efficient way to summarize your video. When the automatic shot engine is started, the video plays and, in real-time, the shots resulting from scene cut detection appear in the main window. Please note that the rate of the video can affect the accuracy of the automatic shot engine. For more information about the video rate, see the bar menu page. When the automatic shot-engine is started, you can still use the buttons on the toolbar in order to pause video, toggle the shot engine mode, etc. For more information about toolbar options, see the toolbar page. | |
| Add shot manually | Adds a shot in the main window, at the tail of the existing shot collection. This essentially takes a snapshot from the current picture of the video. This option is equivalent to one of the toolbar options. For more information about toolbar options, see the toolbar page. | |
| Load shots... | Loads an .hpv file in order to reuse a previous work. This essentially brings back shots from a previous work. An .hpv file is a simple flat file that declares all shots [ markin - markout ] intervals. |
|
| Save shots... | Stores the existing shot descriptors in an .hpv file, for later reuse. .hpv files can be stored wherever you want. |
|
| Delete shots | Deletes all shots displayed in the main window. This function is mainly a shortcut that is quicker than multiple-selecting shots and then right-clicking and choosing Delete shot(s), an option from another context menu. Note that, in order to avoid a misuse of that function, a confirmation box appears. |
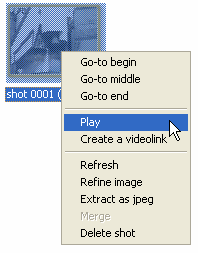
The other context menu appears after you right-click on a selection of one or more shots. The context menu is reproduced below :

Shot context menu
| Menu option > | Description | |
| Go-to begin | Positions the video and the slider at the beginning of the shot. A shot is bound by a begin frame, called a mark-in, and an end frame, called a mark-out. This option shows the actual picture. Tip : you can also double-click the shot. | |
| Go-to middle | Positions the video and the slider right in the middle of the shot's [markin - markout] interval. This option shows the actual picture. | |
| Go-to end | Positions the video and the slider right in the end of the shot's [markin - markout] interval. This option shows the actual picture. | |
| Play | Plays the video, starting from the beginning of the shot's [markin - markout] interval. The video keeps playing even when it gets beyond the current shot's end of [markin - markout] interval. In a future version, the Play option will loop around the shot's [markin - markout] interval. |
|
| Create a videolink | Copy an url in the clipboard which defines the [markin - markout] interval of selected shots, all the information required to play the video clip. This url is what the $(VIDEOLINK) keyword gets resolved to when you are using a template. | |
| Refresh | Makes sure that the picture associated with the shot is really the picture from the beginning of the shot's [markin - markout] interval. Since scene detections create shots based on the actual content of the video, the pictures at the beginning of shots is crucial in the understanding of what happens in that video. | |
| Refine image | Replaces the currently selected shot picture with the current video picture and adapts shot ends accordingly. This option is to let you refine a shot detection according to your needs. A useful scenario is as following : assume the current shot starts at frame 500 and ends at frame 600. The key picture is the one from frame 500 and represents that shot. Now let's assume you want the shot to start at frame 505 instead of 500. Go move the video until you reach frame 505, select the shot, right-click and select Refine image. This will perform the replacement. This feature also works if, for instance, you wanted the shot to start at frame 495 instead of frame 500. |
|
| Extract JPG | Extracts the shot's picture and writes it in jpeg format on the hard drive in the current directory. If more than one shots are selected, then the option is applied to both. | |
| Merge | This option is enabled when at least two shots are selected. It merges both shots into one. | |
| Delete shot(s) | Deletes one or more shots. In order to avoid a misuse of that option, a confirmation box appears. Note that the confirm box can be disabled as well, as a way to improve the productivity. |
Menu options relevant to multiple selection of shots are : Extract JPG, Merge, Delete shot(s).